How to Deploy a Laravel OAuth2 API on Heroku (for free!)
Are you developing a quick frontend application and need a backend API for user authentication? You could put together a Node/Express API from scratch and deploy it on Heroku, but unless you've got a great boilerplate, you'll be spending valuable time integrating dependencies like PassportJS for JWT authentication. Or maybe you don't know too much server-side JS, and you're more comfortable with PHP. That's where Laravel comes in.
Laravel is a PHP framework that gives you essential features like JWT user authentication and routing right out of the box (with an official plugin). And it's surprisingly easy to deploy on Heroku if you know a couple of tips and tricks for proper configuration.
A (Free) API for User Authentication
Today we'll be creating a basic Laravel application with user signup/login and JWT authentication API for apps. And it'll be deployed on the free tier of Heroku, a cloud-based hosting service.
You can then use this cloud-hosted API to integrate a user authentication system to a frontend application made in React, Vue, Angular, etc. Although you will need a secondary "gateway" API to connect to this Laravel API, or use a service that offers environment variables (like Netlify), since frontend apps leave API credentials vulnerable.
This article presumes you have Composer installed globally. You don't have to know the Laravel framework, but it'll help you understand the structure of the application. And it'd probably help to run through the Heroku guide at least once to get your footing there.
Setup Laravel
The first step is getting Laravel setup. We'll install it using Composer, create a SQLite database, and then configure the .env file.
- Install Laravel using Composer:
composer create-project --prefer-dist laravel/laravel laravel-api-heroku-
Open up the project folder (laravel-api-heroku) and go to the
databasefolder and create a new file calleddatabase.sqlite. It should be an empty file -- so just create it, save, and close. -
Go back to the root of the project and copy the
.env.examplefile and name the new file.env. - Open up the new
.envfile. Change theDB_CONNECTIONvariable to equalsqlite, and delete the otherDB_...variables in the section. The section should look like this:
LOG_CHANNEL=stack

DB_CONNECTION=sqlite

BROADCAST_DRIVER=log
CACHE_DRIVER=file
SESSION_DRIVER=file
SESSION_LIFETIME=120
QUEUE_DRIVER=sync
Now we can start to bootstrap Laravel with some basic features like user registration/authentication.
Setting up an Authentication API
Laravel makes it incredibly simple to create a website where users can create an account or login, but it takes the simplicity a step further with the Passport package. Not only do we get user login, registration, password reset, etc all out of the box -- we also get an OAuth2.0 package with Passport that allows you to create a kind of "social login" for your own website (think the Twitter API when you access private user data).
We'll basically be following the same instructions in the Laravel docs, so check those out if you get lost.
Install the authentication package by running:
php artisan make:authNow we can get the Passport package installed.
composer require laravel/passportThen we migrate the new database tables, like the users tables, or API keys.
php artisan migrateNow we can install Passport using Artisan:
php artisan passport:installWe add a new trait to our User model (app/User.php):
<?php

namespace App;

use Laravel\Passport\HasApiTokens;
use Illuminate\Notifications\Notifiable;
use Illuminate\Foundation\Auth\User as Authenticatable;

class User extends Authenticatable
{
    use HasApiTokens, Notifiable;
}
Then Passport::routes method within the boot method of your app/Providers/AuthServiceProvider.php:
<?php

namespace App\Providers;

use Laravel\Passport\Passport;
use Illuminate\Support\Facades\Gate;
use Illuminate\Foundation\Support\Providers\AuthServiceProvider as ServiceProvider;

class AuthServiceProvider extends ServiceProvider
{
    /**
     * The policy mappings for the application.
     *
     * @var array
     */
    protected $policies = [
        'App\Model' => 'App\Policies\ModelPolicy',
    ];

    /**
     * Register any authentication / authorization services.
     *
     * @return void
     */
    public function boot()
    {
        $this->registerPolicies();

        Passport::routes();
    }
}
Finally, in config/auth.php, you should set the driver option of the api authentication guard to passport to authenticate incoming requests with TokenGuard:
'guards' => [
    'web' => [
        'driver' => 'session',
        'provider' => 'users',
    ],

    'api' => [
        'driver' => 'passport',
        'provider' => 'users',
    ],
],
Protip: If you have a previous Laravel installation and you're changing the configuration, make sure to wipe out the config cache by running
php artisan config:cachein the console.
Now we have a Laravel application pre-built with user authentication and OAuth2.0. You can test out the user auth by running php artisan serve and going to the local development server.There you should see the default Laravel landing page, and login and register buttons in the top right of the screen.
Deploying to Heroku
Heroku is a great host with an excellent free hosting package if you're looking quick and easy deployment for most styles of apps (NodeJS, PHP, Ruby, etc). We'll also be leveraging the free tier of their Postres database hosting, which gives you 10k database records to play with.
Check out the guide on Heroku's website for deploying Laravel.
First we have to let the Heroku server know our app is actually in the public/ folder. Let's create a new file in the project root called Procfile and add the following:
web: vendor/bin/heroku-php-apache2 public/Then create a new Heroku application using the CLI:
heroku createNow add your application key for the production site:
heroku config:set APP_KEY=$(php artisan --no-ansi key:generate --show)Commit any changes and push the master branch to the Heroku remote repo:
git push heroku masterNow we can add the database. Add a SQLite database to your Heroku app by going to the Heroku PostgresSQL page and clicking the install button. Then pick your app from the dropdown and click continue. You'll be prompted to pick a pricing plan, I went with the free Hobby plan.
Now you can connect your application to Heroku's Postgres database by updating your config/database.php file:
$DATABASE_URL = parse_url(getenv("DATABASE_URL"));
$DB_CONNECTION = parse_url(getenv("DB_CONNECTION"));

return [

    'default' => env('DB_CONNECTION', $DB_CONNECTION),
    // …

    'connections' => [

        // …

        'pgsql' => [
            'driver' => 'pgsql',
            'host' => $DATABASE_URL["host"],
            'port' => $DATABASE_URL["port"],
            'database' => ltrim($DATABASE_URL["path"], "/"),
            'username' => $DATABASE_URL["user"],
            'password' => $DATABASE_URL["pass"],
            'charset' => 'utf8',
            'prefix' => '',
            'schema' => 'public',
            'sslmode' => 'require',
        ],

        // …

    ],

    // …

];
We also need to edit the environment variables to let Laravel know to use the pgsql database driver when we use Heroku in production. Head over to your project on Heroku, go to the Settings page, and click Show Config Vars. Make a new entry with they key DB_CONNECTION and pgsql as the value.
Now remove the OAuth keys that were generated locally from the .gitignore file by deleting this line:/storage/*.key. Ideally we'd generate these in production, but I had issues with Heroku generating them, so we just import the local ones instead!
Commit your changes to make the database connection real:
git add .
git commit -m "Added Heroku database configuration"
git push heroku master
Now that your database has been connected, make sure to run your database migrations in production to structure your fresh DB. You'll be running it through the Heroku CLI:
heroku run php artisan migrateYour Laravel website should be live! You can register new users and login with the credentials you create.
Connecting to your new API
If you'd like to make an authenticated request to the API through a certain user, you'll either need to go through the OAuth2.0 verification process, or provide a personal access token (or JWT). Laravel Passport allows you to create a new client with a simple command line script:
heroku run php artisan passport:client --personalWhen prompted for an app name, name it anything, and click Enter. You'll be provided a Client ID and Secret which you'll use to access the API remotely.
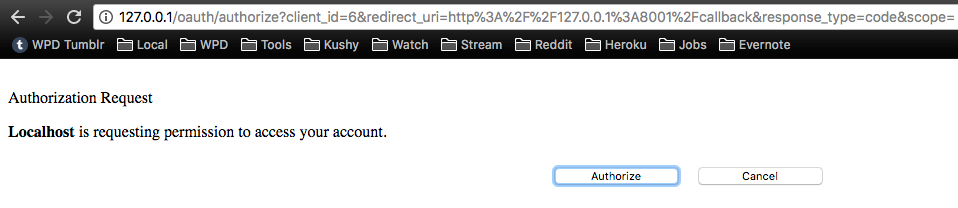
If you're not familiar with the OAuth2.0 protocol, here's a quick breakdown. OAuth2.0 protects your API by creating a 3-step verification system before offering a secure token to access the Laravel API endpoints secured with middleware authentication.
-
You first redirect the user to the Laravel API's OAuth Authorize page (
http://yourlaravelapp.com/oauth/authorize) and attach your Client ID and a callback URL to the request. - The user is either presented a login screen - or if they're already logged in - they see an authorization form to allow your frontend app to access their data (similar to Twitter's authorization when you use social login). Then the API then redirects the user back to the callback URL you provided, and it sends over a secret token.
- You take that secret token and send it back to the API with your Client ID, secret, and callback URL. The API responds back with another secret token, this time a personal access token for the specific user that authorized by logging in. This personal access token is a JWT or JSON Web Token, which is an industry standard method for authorizing between APIs.
Any time we'd like to access any part of the API that requires authentication, like private user data, we send our request to the API with a Authorization Bearer token in the header. That token in the JWT we generated in step 3.
Here's a snippet of this kind of setup in Laravel using session() to store the access token. Remember, this is a separate "gateway" application that obfuscates your API credentials for a frontend app:
Route::get('/', function () {
    $query = http_build_query([
        'client_id' => '420',
        'redirect_uri' => 'http://127.0.0.1:8001/callback',
        'response_type' => 'code',
        'scope' => 'access-patient-status'
    ]);

    return redirect('http://127.0.0.1/oauth/authorize?'.$query);
});

Route::get('/callback', function (Request $request) {
    $response = (new GuzzleHttp\Client)->post('http://127.0.0.1/oauth/token', [
        'form_params' => [
            'grant_type' => 'authorization_code',
            'client_id' => '420',
            'client_secret' => 'EXKWFSwGHrbGdC3M4F5kkzmtCZIXyE3fbA8agtw2',
            'redirect_uri' => 'http://127.0.0.1:8001/callback',
            'code' => $request->code,
        ]
    ]);

    session()->put('token', json_decode((string) $response->getBody(), true));

    return redirect('/user');
});

Route::get('/user', function () {
    if ( ! session()->has('token')) {
        return redirect('/');
    }

    $response = (new GuzzleHttp\Client)->get('http://127.0.0.1/api/user', [
        'headers' => [
            'Authorization' => 'Bearer '.Session::get('token.access_token')
        ]
    ]);

    return json_decode((string) $response->getBody(), true);
});
You could also accomplish this in a React app using react-router to create the callback route, and a service like Netlify to securely access API key variables in your build environment. (rather than exposing them directly in your production code).
Let the hackathons begin
I hope this inspires you to tackle your projects in a new way. We're living in the transition away from the monolith towards a microservices based architecture, and this type of setup will help you migrate your projects into this new infrastructure. The JAMstack revolution is upon is, and developers are engineering more frontend applications that utilize these modular, cloud-distributed API solutions.
You can take your app's source code and host it on a CDN for the most efficient distribution. And rather than pound the same server you're using to host the frontend to run requests to the backend to login or register users, we break that service out into a separate API that lives on it's own server. If the authentication API server crashes, it never takes down the website CDN (besides the functionality the API provides). It's the future!
Consider leveraging the power of Laravel's Socialite package to integrate social login into your API, and allow users to create accounts with social media profiles from Twitter, Facebook, etc.
Looking for the source code? 💻 ⚙️ Find this completed project source code on Github here.
Stay regular,
Oscar
Keep Reading:
